User Help System
Updating ICC Account Limits via Upload
The following instructions illustrate the process to use the upload function to manage multiple product limits for an execution firm that uses ICC.
- To update ICC Credit Controls via Upload:
- Perform an account search and select an ICC (CME Globex) enabled account,
- From the Services pane, select ICC (CME Globex).

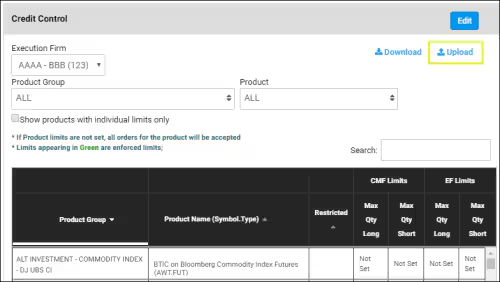
- On the Credit Control pane that appears, select the Execution Firm, deselect Show products with individual limits only, then Download the spreadsheet.

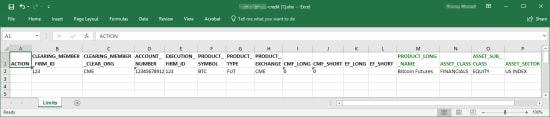
- Open the downloaded spreadsheet (account-number-credit.xlsx), then update the maximum permissible long / short limits, for the Clearing Member Firm and/or Execution firm.
- For all updated rows, enter X in the Action column, then save the updates.

- On the Credit Control pane, select Upload.
Note: Account limits can also be uploaded from the Account List page![]() Select Upload, ICC_Limits
Select Upload, ICC_Limits![]()
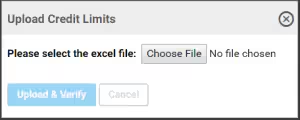
 , Choose a File, then select Upload & Verify..
- Choose the File, then select Upload & Verify.
Note: Uploads are limited to 20,000 records / rows per upload.
The uploaded file is evaluated and validation dialog appears:
- Success: A confirmation message lists submitted updates, fields and values for each spreadsheet row.

- Failure: An error message appears, with recommended resolution.
Example: Incorrect data, Action column not marked with X.
When uploading after an error, select New then choose the updated spreadsheet.
- After receiving a successful validation message, select Submit, then select OK to close the upload dialog.

Managing ICC Credit Controls for Multiple Execution Firms
The following instructions illustrate the process to use the upload function to manage product limits for multiple execution firms, including blocking order submission for a given product.
Summary:
- Search and download clearing firm accounts list; step 1 - 2.
- Search for an account, then update execution firm (product) credit controls; step 3 - 5.
- Download account - execution firm credit controls spreadsheet; to use as a template; step 6 - 7.
- Copy execution firm details (template) to new spreadsheet rows, step 8.
- On the new spreadsheet rows, update account and execution firm information (from clearing firm accounts spreadsheet); step 9.
- Upload and validate credit controls spreadsheet; step 10 - 12.
- To manage multiple execution firm product limits, via upload:
- From the Account page, perform a clearing account search, for ICC authorized accounts.
Clearing Account![]() Search Criteria:
Search Criteria:
Account Type, Service, Account Number, Spot FX Ref Number, Clearing Member, Account Owner, Execution Firm,Status![]() ok
ok
- On the Accounts list that appears, select Download (
 ).
).
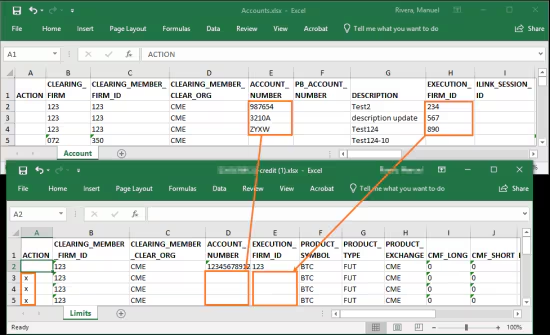
A list of accounts, authorized for this clearing firm, is downloaded to the default download directory, as a MS Excel file (Accounts.xlsx).
Save this file for step 9.

- From the search results, select an Account Number, then select the Service ICC (CME Globex).
- Select an Execution Firm to use as the basis for other firms, then deselect the checkbox, Show products with individual limits only.

Example: To block order submission, set Max Qty Long / Short to zero (0![]()
 ).
).
Once confirmed the execution firm cannot submit trades for this product.
- Download the credit control spreadsheet (account-num_credit.xlsx) for the selected account and execution firm.
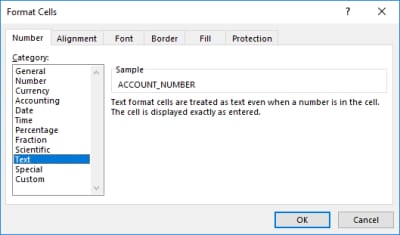
- Open the spreadsheet, right-click the ACCOUNT_NUMBER column and format to Text (Number tab).


- Copy the row then duplicate as many times as necessary for the accounts you want to restrict.
- Open the Accounts.xlsx spreadsheet, copy the ACCOUNT_NUMBER and EXECUTION_FIRM_ID values to the account number fields of the acct-num_credit.xlsx spreadsheet.
In the ACTION column, enter X for all updated rows.
- Save the spreadsheet updates, select Upload (
 ), then select an upload type.
 - Select ChooseFile, browse to the file, then select Upload & Verify.
Note: Uploads are limited to 20,000 rows. For more than 20,000, perform additional uploads.
The uploaded file is evaluated and validation dialog appears:
- Success: A confirmation message lists submitted updates, fields and values for each spreadsheet row.
- Failure: An error message appears, with recommended resolution.
When uploading after an error, select New then choose the updated spreadsheet.
- After receiving a successful validation message, select Submit.
Upon completion of the upload, select OK, then close the Upload dialog.


