User Help System
Creating a New Main Account
Within the Account Maintenance – View screen, the User can create a new Main Account by performing the following steps:
- Select the Firm under which the main account will clear.
- Select the Create Main Account button.
- After the Create Account button has been selected, additional fields (Main Account, Account Type, Effective and Expiration Date, Account Title, Omnibus and Non Mbr Indicators) will appear.
- Select Single Exchange Mode to create the Main Account within only the current Exchange or Across Exchange Mode to create the Main Account in the current Exchange and one or more additional Exchanges.
In order to use the Across Exchange Mode when creating a new Main Account, the following conditions must exist:
- Account owner must be the same across the selected Exchanges.
- Account owner must have a membership/incentive program status across the selected Exchanges.
- Main Account Number, Firm Type and effective date must be the same across the selected Exchanges.
- Controllers must be members at each of the selected Exchanges. If Controllers differ across the selected Exchanges, the User will need to edit the Controllers in the Single Exchange Mode.
- If Across Exchange Mode is selected, the following steps will have to be completed:
- Select the Exchange(s) by clicking the corresponding checkbox(es).
- Select the Firm(s) from the drop-down list.
Creating a New Main Account using Across Exchange Mode

Creating a New Main Account (Single Exchange Mode) and Associated Fields to be populated
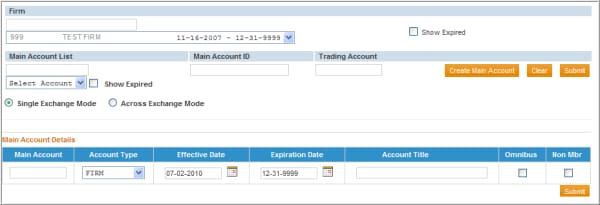
- Complete the Main Account Details.
Field Descriptions of the Main Account Details:
|
FIELD NAME |
DESCRIPTION |
|---|---|
|
Main Account |
This is the Main Account (roll up account, account alias or grouping account) to which the User wishes to associate the Trading Account(s). |
|
Account Type |
Account Type selection determines the list available for the account owner selection: • Firm – Only Firm/Entities may be the account owner • Individual – Only Individual Members may be the account owner • Joint – Two or more Individual Members may be listed as the account owner • Non-Member – An account that is jointly owned by a Member and a Non-member can be registered under this account type. |
|
Effective Date |
The date the main account became effective. |
|
Expiration Date |
The date the main account is no longer active. If the account is active, the expiration date should be left as the default date of 12-31-9999. |
|
Account Title |
This field is required as an audit trail of the underlying account owner whenever the account owner identified in the clearing member’s equity system (i.e. account statement) does not exactly match the account owner registered in EFS. Otherwise, this field is optional for the User to add a description for tracking purposes. |
|
Omnibus |
This indicator is used to identify an omnibus account for audit purposes only. |
|
Non Mbr |
This indicator is used to identify that the account is jointly owned by a Non-member. This will automatically be checked when an Account Type of Non-Member is selected, and will automatically result in the account receiving Non-member rates. |
- To enter main account details:
- Enter the Main Account Number in the Main Account field.
- Select the Account Type from the drop-down list.
- Enter the Main Account’s Effective Date by either:
- Typing in the date (in the format of MM-DD-YYYY) or;
- Select the calendar icon to the right of the Effective Date field and select the appropriate date.
- The Expiration Date will default to 12-31-9999 to indicate that the account will be active until a further update is made. To select a different Expiration Date either:
- Type in the date (in the format of MM-DD-YYYY) or;
- Select the calendar icon to the right of the Expiration Date text field and click on the appropriate date.
- Enter a title in the Account Title field.
- Select the check box if this is an Omnibus account.
- Select the check box if a Non-Member jointly owns the account.
- After completing each field, select the Submit button to create the main account details.
A message will display confirming the main account has been created.
NOTE: Performing the above steps only creates the Main Account record. The User must also add the respective Trading Accounts and associate the account owners/controllers in order for the account to be eligible to receive reduced rates. Refer to the screen below noting the remaining fields that need to be completed.


