User Help System
Processing Rejects
The purpose of this test is to verify that your application can receive and process reject messages.
Pre-Registered or On-Demand Format
Note: This test is used for both Pre-Registered and On-Demand formats. The image below shows the Pre-Registered format version of the test.

Note: If a test is not proceeding to the next step, selecting the Refresh button ( ) below the test steps may resolve the issue.
- To run a Processing Rejects test:
- Select a SenderComp from the drop-down and select ASSIGN if a SenderComp is not already assigned.
- Click the "START TEST" button.
Note: DO NOT select the "START TEST" button once the test process is in progress.
- Over an iLink connection, submit a Limit Day Order for the instrument.
- Select Yes or No to indicate whether your system received and processed the Execution Report - Reject correctly.
- Submit a Limit Day Order for the instrument.
- Select Yes or No to indicate whether your system received and processed the Business Reject correctly.
- Submit a Limit Day Order for the instrument. Receive and process the Execution Report or Not Applied message.
- Submit a Limit Day Order for the instrument.
- Select Yes or No to indicate whether your system received and processed the Execution Report - New Order.
- Submit an Order Cancel Request message for the order placed in step 5.
- Select Yes or No to indicate whether your system received and processed the Order Cancel Reject correctly.
Note: The remaining steps are only required for client systems that support Order Cancel-Replace functionality.
- Submit a Limit Day Order for the instrument.
- Select Yes or No to indicate whether your system received and processed the Execution Report - New Order.
- Submit a Order Cancel/Replace Request message for the order placed in step 9.
- Select Yes or No to indicate whether your system received and processed the Order Cancel Replace Reject correctly.
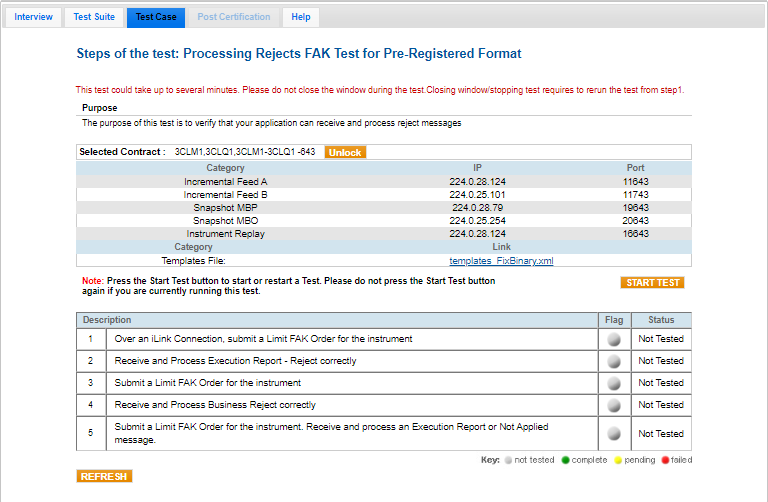
Pre-Registered or On-Demand Format (FAK Only)
Note: This test is used for both Pre-Registered and On-Demand formats. The image below shows the Pre-Registered format version of the test.

Note: If a test is not proceeding to the next step, selecting the Refresh button ( ) below the test steps may resolve the issue.
- To run a Processing Rejects FAK test:
- Select a SenderComp from the drop-down and select ASSIGN if a SenderComp is not already assigned.
- Click the "START TEST" button.
Note: DO NOT select the "START TEST" button once the test process is in progress.
- Over an iLink connection, submit a Limit FAK Order for the instrument.
- Select Yes or No to indicate whether your system received and processed the Execution Report - Reject correctly.
- Submit a Limit FAK Order for the instrument.
- Select Yes or No to indicate whether your system received and processed the Business Reject correctly.
- Submit a Limit FAK Order for the instrument. Receive and process the Execution Report or Not Applied message.


